David Elentok's Blog
3-Pane Layout in WPF
March 12, 2010
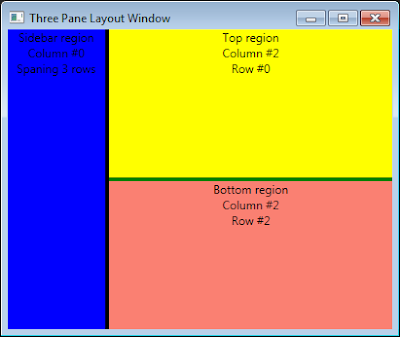
I've started playing with Prism again, and in the application I'm writing I needed a three-pane layout with splitters (ignore the ugly colors):
Now, I've done this before, but I couldn't find that code anywhere, so I started writing it from scratch. Apparently, there are several ways to do this, but the way I chose to do it works like this:
-
The primary container is a Grid
-
It has 3 rows and 3 columns
-
There are two splitters:
- The vertical splitter spans the entire middle column
- The horizontal splitter spans the entire middle row
-
There are three panels:
- The sidebar pane spans the entire left column
- The top pane is in the top-right column
- The bottom pane is in the bottom-right column
The hardest part was to get the "MinWidth/MinHeight" to work (if I hard-code the width of one of the columns, then the MinWidth of the other column is ignored), I ended up settings the width and heights of the columns/rows using "*".
And here is the XAML code:
<Window x:Class="WpfSandbox.ThreePaneLayoutWindow"
   xmlns="http://schemas.microsoft.com/winfx/2006/xaml/presentation"
   xmlns:x="http://schemas.microsoft.com/winfx/2006/xaml"
   Title="Three Pane Layout Window" Height="300" Width="300">
   <Grid>
       <Grid.ColumnDefinitions>
           <ColumnDefinition Width="1*" MinWidth="100" />
           <ColumnDefinition Width="4" />
           <!-- the splitter's column -->
           <!-- the "3*" will make the 3rd column 3 times as wide as the first one -->
           <ColumnDefinition Width="3*" MinWidth="100" />
       </Grid.ColumnDefinitions>
       <Grid.RowDefinitions>
           <RowDefinition Height="*" MinHeight="100" />
           <RowDefinition Height="4" />
           <!-- the splitter's row -->
           <RowDefinition Height="*" MinHeight="100" />
       </Grid.RowDefinitions>

       <!-- sidebar (column #0, spanning 3 rows) -->
       <TextBlock Name="SidebarRegion"
                  HorizontalAlignment="Stretch"
                  VerticalAlignment="Stretch"
                  TextAlignment="Center"
                  Background="Blue"
                  Grid.Column="0" Grid.RowSpan="3">
           Sidebar region<LineBreak />
           Column #0<LineBreak />
           Spaning 3 rows
       </TextBlock>

       <!-- vertical splitter (column #1, spanning 3 rows) -->
       <GridSplitter ResizeDirection="Columns"
                     HorizontalAlignment="Stretch"
                     VerticalAlignment="Stretch"
                     Background="Black"
                     Grid.Column="1" Grid.RowSpan="3"/>

       <!-- top area (column #2, row #0) -->
       <TextBlock Name="TopRegion"
                  HorizontalAlignment="Stretch"
                  VerticalAlignment="Stretch"
                  TextAlignment="Center"
                  Background="Yellow"
                  Grid.Column="2" Grid.Row="0">
           Top region<LineBreak />
           Column #2<LineBreak />
           Row #0
       </TextBlock>

       <!-- horizontal splitter (column #2, row #1) -->
       <GridSplitter ResizeDirection="Rows"
                     HorizontalAlignment="Stretch"
                     VerticalAlignment="Stretch"
                     Background="Green"
                     Grid.Column="2" Grid.Row="1" />

       <!-- bottom area (column #2, row #2) -->
       <TextBlock Name="BottomRegion"
                  HorizontalAlignment="Stretch"
                  VerticalAlignment="Stretch"
                  TextAlignment="Center"
                  Background="Salmon"
                  Grid.Column="2" Grid.Row="2">
           Bottom region<LineBreak />
           Column #2<LineBreak />
           Row #2
       </TextBlock>
   </Grid>
</Window>
